
To check soap trace points, you can use five reliable techniques: the drizzle test (where soap forms lasting trails at medium trace), the spoon trail method (observe how long patterns remain), ribbon trail analysis (examine flow characteristics), visual consistency assessment (from thin batter to pudding-like), and temperature monitoring (100-110°F for slower trace). Watch for peaks that hold their shape and test flow by lifting your stick blender to see if batter leaves distinct patterns. These indicators guarantee perfect timing for your design techniques.
Proven Methods to Check Soap Making Trace Points
Five reliable techniques exist to confirm you've reached proper trace in soap making.
The most common method involves drizzling soap batter over the surface—if it leaves a visible line for several seconds, you've achieved light trace.
When your mixture thickens to thin pudding consistency with momentary surface trails, you've reached medium trace.
Heavy trace occurs when your batter becomes thick enough to hold its shape, perfect for layering or sculpting designs.
Watch for false trace by checking for grainy textures or oil separation, indicating your mixture hasn't fully emulsified.
Try stirring and pulsing with your blender to verify true emulsification.
Monitoring temperature provides another valuable indicator—higher temperatures accelerate tracing.
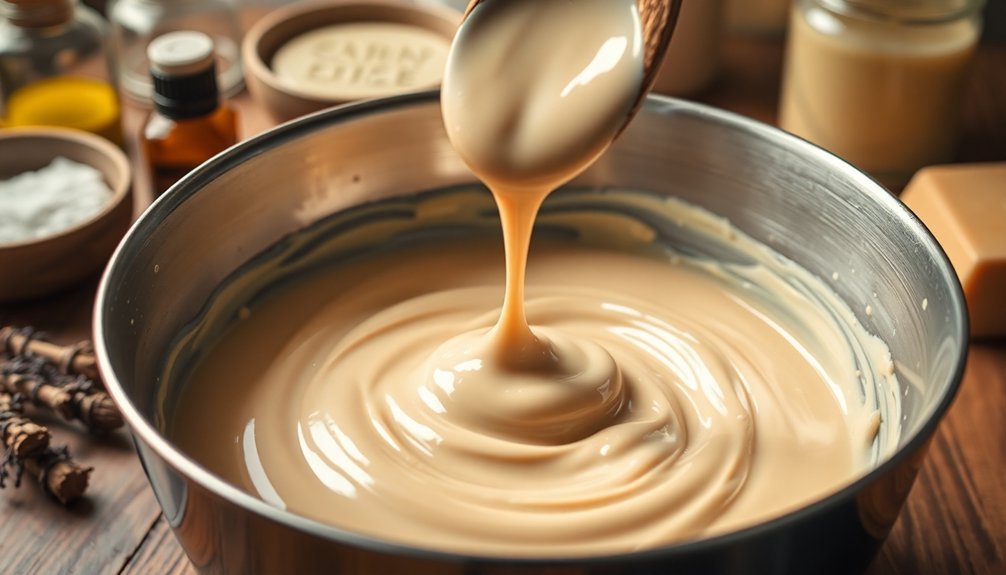
The Drizzle Test: Reading Surface Patterns
While visual examination offers valuable clues about trace stages, the drizzle test provides definitive confirmation of your soap batter's consistency. This technique involves lifting some soap batter and drizzling it back onto the surface from a height, then observing the patterns created.
| Trace Stage | Surface Pattern Characteristics |
|---|---|
| Light Trace | Faint trails that quickly disappear; resembles thin salad dressing |
| Medium Trace | Defined lines that remain visible briefly; similar to ketchup consistency |
| Thick Trace | Drizzled soap holds its shape on surface; resembles pudding or soft custard |
| Ready for Molding | Thick trace that maintains pattern definition |
| Visual Cue | Pattern persistence indicates trace development stage |
This reliable visual cue helps you determine precisely when your soap batter has reached the appropriate trace for your specific design technique, ensuring peak results in your finished soap.
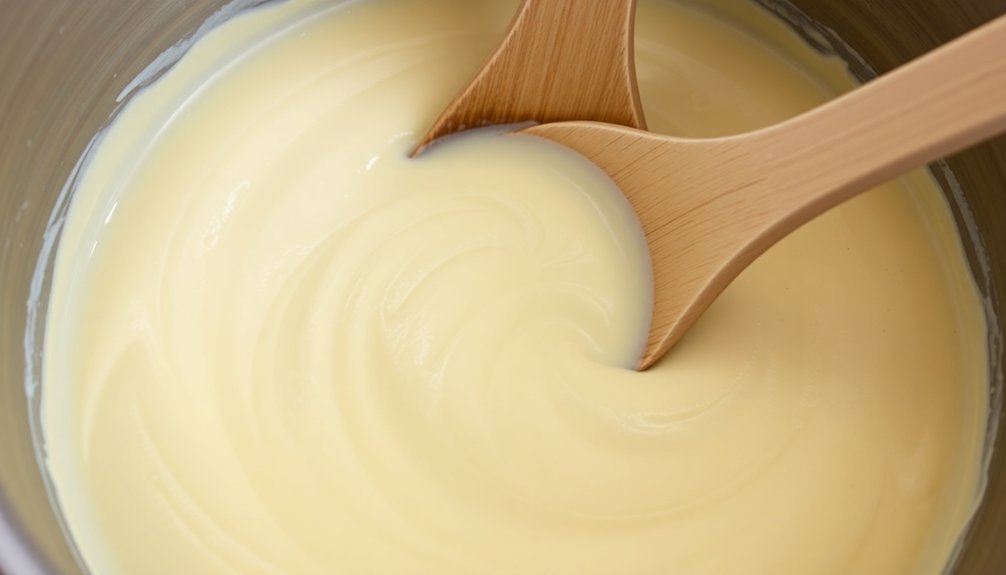
Consistency Assessment: From Thin Batter to Pudding
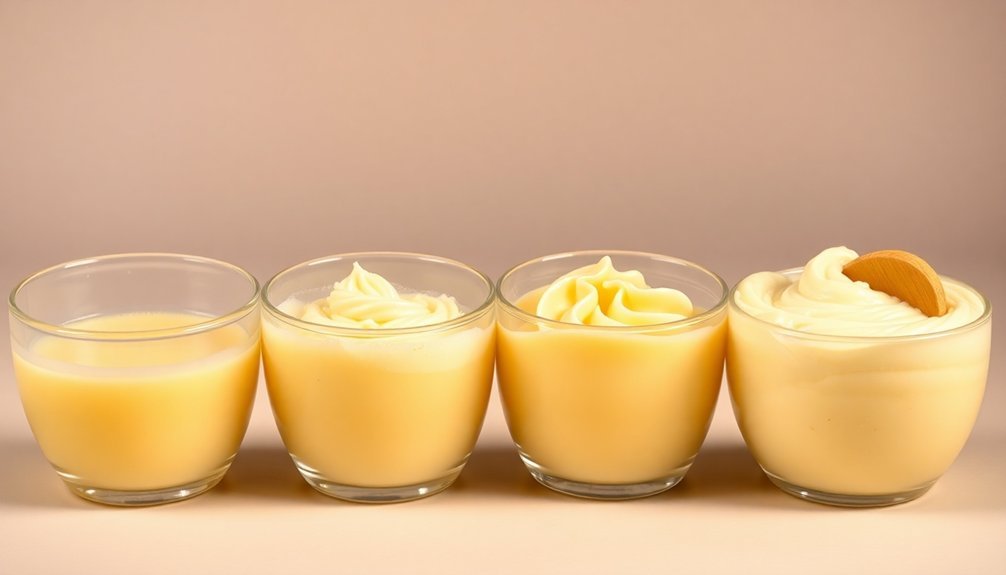
Understanding soap batter consistency empowers you to confidently execute your desired soap design techniques. The journey from ultra light trace to heavy trace follows a predictable progression that you'll learn to recognize through careful assessment.
At light trace, your soap mixture resembles thin batter—pourable like cake mix but thick enough to leave faint lines when drizzled across the surface.
As you reach medium trace, the consistency transforms to thick pudding that briefly holds its shape before settling back.
Heavy trace marks the final stage, where your batter achieves a custard-like consistency that maintains its form when manipulated.
Recognizing these distinct stages is essential for implementing your design plans and ensuring proper saponification. The right consistency determines whether your soap will accept swirls, layers, or textured tops successfully.
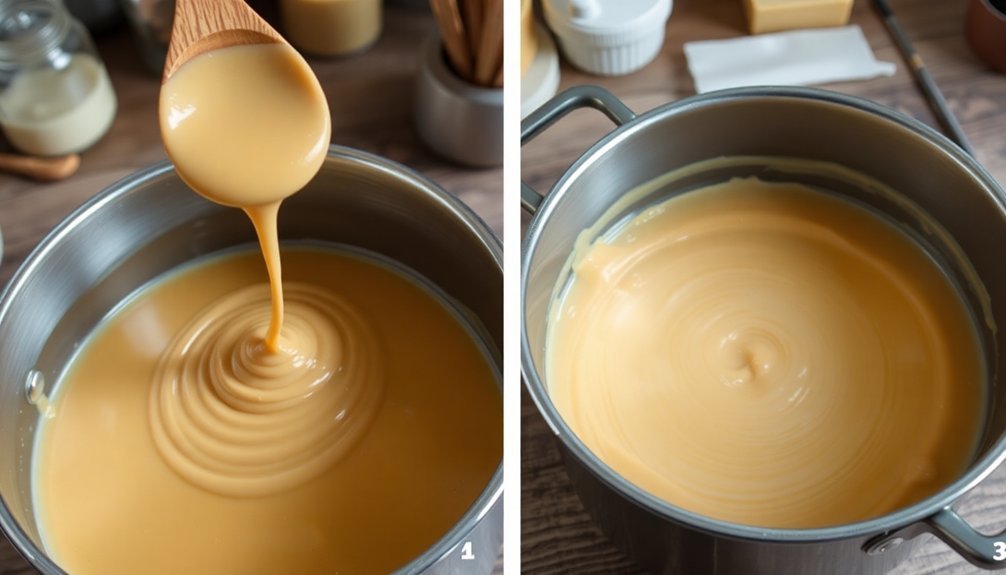
Spoon Trail Technique: Measuring Persistence
The spoon trail technique serves as a reliable visual indicator for measuring trace in your soap batter.
By drizzling a small amount of soap from a spoon back into your mixture, you'll gain immediate visual assessment of your trace point without relying on time or temperature alone.
- Light trace: Your drizzle disappears quickly into the surface—perfect for intricate swirl designs
- Medium trace: The trail lingers briefly before fading—ideal for layered soaps
- Heavy trace: Your drizzle sits prominently on the surface—essential for textured tops
- Mastery: With practice, you'll recognize each stage instinctively, giving you ultimate control
This technique transforms abstract concepts into tangible observations, enhancing your consistency control throughout the soap-making process.
As you develop this skill, you'll make more confident decisions about when to pour.
The Ribbon Test: Evaluating Flow Characteristics
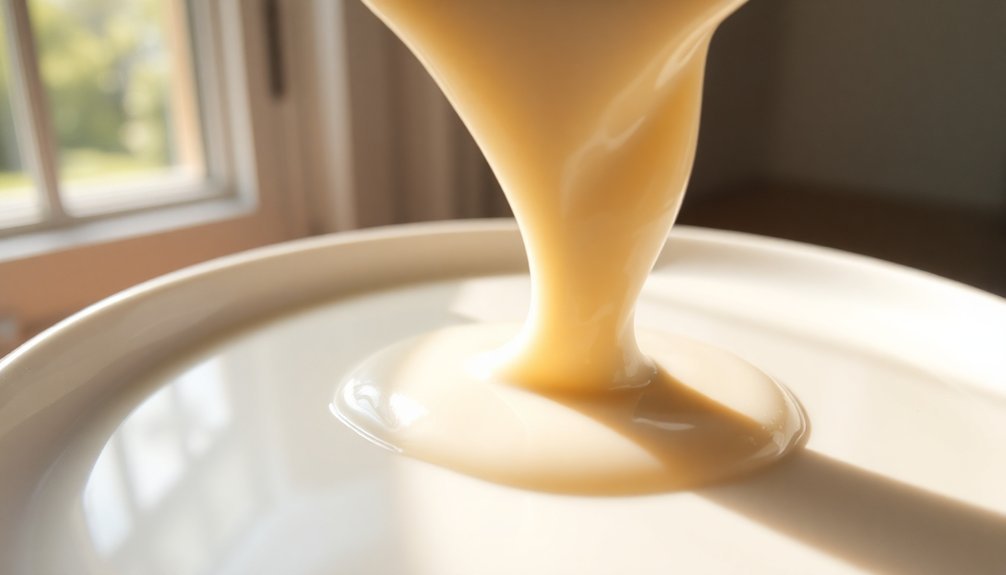
To test soap batter using the ribbon technique, hold your spatula or stick blender 3-4 inches above the mixture and observe how the drizzled soap behaves when it hits the surface.
You'll notice different patterns depending on trace stage—thin ribbons that disappear indicate light trace, while persistent patterns suggest medium to thick trace.
Watch carefully for when the drizzle sits momentarily on top before sinking, as this visual assessment provides essential information about when your soap has reached the ideal consistency for your specific design needs.
Drizzle Height Matters
Successful soap makers recognize that drizzle height provides essential information about your soap batter's consistency.
When performing the Ribbon Test, the height from which you drizzle soap directly impacts your ability to accurately assess trace. At light trace, your mixture has the consistency of thin cake batter and requires lower drizzling heights to observe how quickly it disappears.
- Low drizzle (1-2 inches) – Perfect for detecting light trace when the visibility line barely forms
- Medium drizzle (3-4 inches) – Ideal for confirming medium trace occurs, when your soap is ready for additives
- High drizzle (5-6 inches) – Helps verify thick trace, when the batter holds its shape firmly
- Varied heights – Allows you to compare how different drizzle heights affect your assessment of the same batch
Visual Assessment Techniques
Mastering the Ribbon Test provides you with crucial information about your soap batter's readiness for the next steps in your process.
When well mixed through stirring and stick blending, your batter's consistency becomes a critical visual cue to timing.
The Ribbon Test refers to drizzling soap batter over the surface and observing its behavior. At light trace, the ribbon disappears instantly, while medium trace leaves a visible line briefly before sinking.
When your soap has reached thick trace, the ribbon sits on top without disappearing—perfect for intricate designs.
Try moving the batter in circular motions to confirm consistency. This assessment helps determine when additives yield ideal results before being poured into the mold.
Repeat this test throughout your process to verify you're achieving the perfect trace for your specific soap design.
Visual Clues: Color Changes During Emulsification
While you stir your soap mixture, a fascinating transformation occurs as the oils and lye water combine into an emulsion. This visual journey from translucent to opaque signals your soap's progression through trace stages.
Watch for these key color changes:
- Initial Emulsification – Your batter turns milky and opaque, showing the first signs of successful combination.
- Light Trace – Observe a solid, streak-free color similar to thin cake batter.
- Medium Trace – Notice deeper color saturation with visible drizzle lines remaining on the surface.
- Thick Trace – See intense, uniform coloration resembling pudding.
Beware of false trace, which appears grainy with inconsistent coloration. This indicates incomplete emulsification that may revert if left standing.
True trace displays consistent color throughout, confirming your soap is properly forming.
Temperature Monitoring for Accurate Trace Detection
As you navigate the delicate chemistry of soap making, temperature stands as one of the most critical variables affecting your trace development. Monitoring both your oils and lye solution temperatures guarantees maximum emulsification and helps you avoid false trace issues that can ruin your batch.
| Temperature Range | Effect on Trace | Best For | Risk Factor |
|---|---|---|---|
| 100-110°F | Slower trace | Intricate designs | Minimal |
| 100-130°F | Accelerated trace | Basic soaps | Medium |
| Below 86°F | Inconsistent trace | Not recommended | High |
| 30°C+ (86°F+) | Controlled trace | Cold conditions | Low |
Keep your soap-making process in a temperature-controlled environment for consistent results. When temperatures drop suddenly, you'll experience slower trace development. By heating oils to at least 86°F before combining with lye solution, you'll gain better control over thick trace timing and maintain perfect texture throughout.
Stick Blender Withdrawal Method: Examining Peaks
The withdrawal method offers you a reliable way to judge your soap's trace stage by examining how peaks behave when you lift your stick blender.
You'll notice soft peaks dissolve quickly during light trace, while medium trace creates ribbons that hold their shape momentarily before melting back.
As you become more experienced, you'll recognize the distinct patterns of thick trace where peaks maintain their form, allowing you to confidently move forward with additives or pour techniques.
Subheading Discussion Points
Testing for trace using the Stick Blender Withdrawal Method provides soap makers with clear visual indicators of their batter's consistency.
By briefly lifting your stick blender from the mixture, you'll observe how the batter behaves, giving you vital information about where you're in the saponification process.
- Light trace – Drizzled soap leaves fleeting peaks that quickly disappear, perfect timing to add fragrance oils and colorants before the mixture thickens.
- Medium trace – Peaks remain visible momentarily before smoothing out, indicating it's time to add heavier additives.
- Heavy trace – Defined peaks hold their shape longer, ideal for textured designs and layering techniques.
- Monitoring consistency is essential as certain fragrance oils can dramatically accelerate trace, potentially rushing your soap making process.
Soft Peak Identification
Identifying soft peaks marks your first milestone in the trace evaluation process. To check for this stage, withdraw your stick blender from the soap batter and observe the peaks that form. When they gently collapse back into the mixture, you've reached soft peak trace.
Your batter should display a creamy texture similar to thin cake batter, with drizzled soap leaving light trails on the surface. This is the perfect moment to incorporate additives like colorants and fragrances, as you'll have sufficient working time before further thickening occurs.
Achieve soft peaks by blending in short bursts, allowing the mixture to emulsify gradually.
Mastering this identification technique gives you control over your soap design, as it represents the critical shift from basic emulsion to a more stable mixture ready for your creative touch.
Ribbon Trail Analysis
While your stick blender rests momentarily, examine the patterns formed as soap batter drizzles back into your mixture—this classic technique reveals essential information about your soap's trace stage.
The ribbon trail method gives you precise control over your soap-making process by allowing you to visually assess consistency.
- Light trace: Your drizzled batter leaves a fleeting line that quickly disappears into the surface—perfect for intricate swirl designs.
- Medium trace: The soap creates a visible ribbon that sits momentarily before sinking, similar to ketchup consistency.
- Thick trace: Your batter holds distinct peaks and maintains its shape when drizzled—ideal for sculptural techniques.
- Visual confirmation: This withdrawal method eliminates guesswork, allowing you to confidently proceed to the next steps with exactly the right consistency.
Time-Based Benchmarks for Different Oil Formulations
Several key factors affect how quickly your soap reaches trace, with oil formulation being one of the most significant.
When working with mainly liquid oils like olive oil, you'll typically achieve trace within 5-10 minutes of stick blender use at 100-130°F.
For blends containing 75% olive oil and 25% coconut oil, expect trace in under 2 minutes due to coconut oil's faster saponification rate.
Formulations high in hard oils like palm or shea butter may require 10-15 minutes to trace, depending on temperature.
You'll notice accelerated trace times when implementing water discounts, often reaching trace in just 1-3 minutes with a stick blender.
Similarly, certain fragrance oils, particularly floral or spicy scents, can reduce your time to medium trace to only 2-5 minutes.
Frequently Asked Questions
How to Know When Soap Reaches Trace?
You'll know your soap's reached trace when it thickens to a pudding-like consistency. Look for drizzled batter that leaves visible trails on the surface. Use a stick blender to speed up this process considerably.
What Does a False Trace Look Like in Soap?
False trace looks grainy or flaky, resembling thick pudding but lacking true emulsification. You'll notice it's not creamy or uniform. When left to sit, it'll separate back into oil and lye components.
What Causes False Traces in Soap Making?
False traces happen when your solid oils solidify prematurely. You'll see this when your oils cool below their melting point while mixing, or when you don't maintain proper temperature balance between your lye solution and oils.
What Is the Biggest Mistake First Time Soapmakers Make?
The biggest mistake you'll make as a first-time soapmaker is misjudging trace. You'll either blend until it's too thick, limiting design time, or stop too early, resulting in separation and improperly saponified soap.
In Summary
You've now mastered the essential techniques for identifying soap trace points. By watching for surface patterns, consistency changes, and visual clues, you'll know exactly when your soap has reached the perfect trace. Remember, different oil combinations behave uniquely, so practice these methods regularly. With these reliable testing approaches in your soapmaking toolkit, you'll create consistently successful batches every time you're at the mixing bowl.


Leave a Reply