To color soaps with pure mineral oxides, you'll need to pre-mix your chosen oxide with lightweight oil in a 1:1 ratio before adding it to your soap batch. Keep usage rates under 5% of total soap weight, and work in a well-ventilated area using gloves, a dust mask, and safety goggles. Mix oxides at trace with a stick blender for even distribution, and store finished soaps in cool, dark places. Master these basics, and countless color possibilities await.
Understanding Mineral Oxide Properties in Soap Making

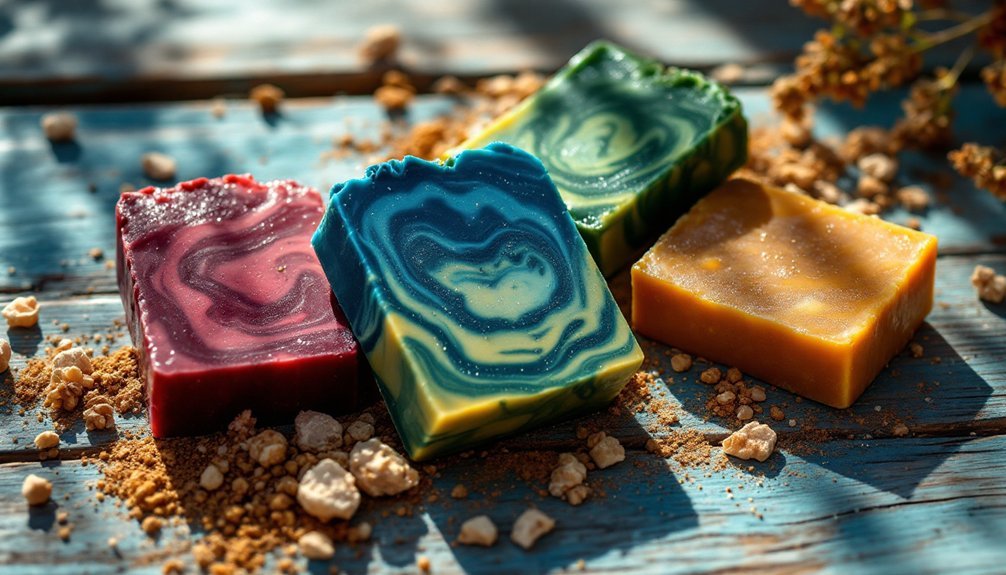
When working with mineral oxides in soap making, you'll discover these natural inorganic compounds offer unmatched color stability and vibrancy. Unlike synthetic alternatives, they won't fade, bleed, or change in high pH environments, making them perfect for cold process methods.
You can explore a diverse palette of vibrant colors, from rich reds and yellows to deep browns and blacks.
To get the best results, you'll want to pre-mix your mineral oxides with a light oil before adding them to your soap batch – this prevents unwanted specks in your final product.
Remember to keep your usage rate under 5% of your total soap weight for ideal safety and effectiveness.
These natural colorants give you the confidence to create consistently beautiful soaps that maintain their appearance over time.
Essential Tools and Safety Equipment for Oxide Handling
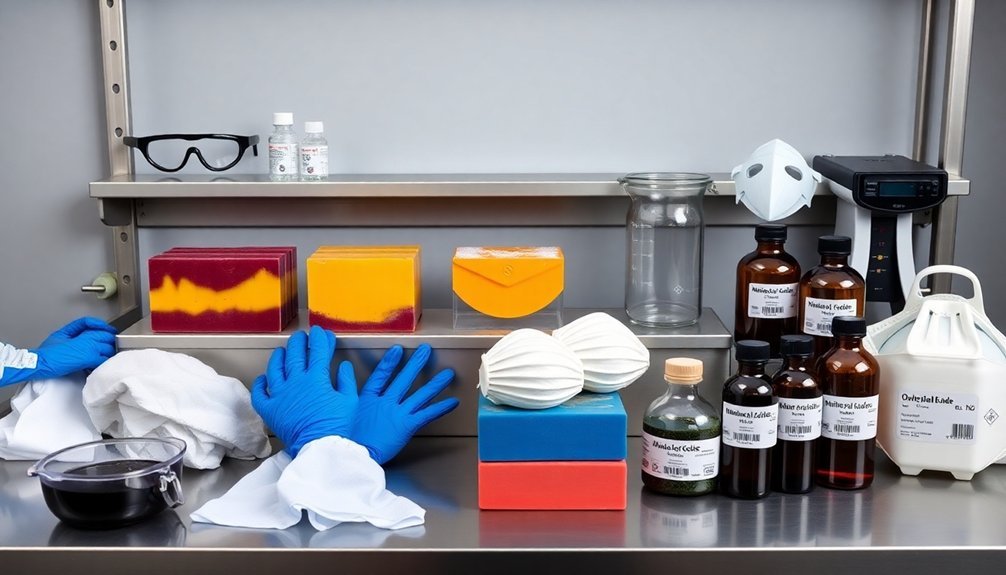
Working safely with mineral oxides requires specific tools and protective gear to safeguard your health.
Proper safety equipment and protocols are essential when handling mineral oxides to protect yourself from potential health hazards.
You'll need protective gloves to prevent skin contact with the fine particles and a dust mask to avoid inhaling the powdered oxides during handling. Safety goggles are essential to shield your eyes from accidental splashes or airborne dust while measuring oxides.
A dedicated scale for precise measurements is a must-have tool, as accuracy directly impacts your soap's final color.
When working with these materials, guarantee you're in a well-ventilated area to minimize exposure to oxide particles.
Don't forget to store your oxides in airtight containers – this keeps them safe from moisture and contamination that could affect their performance in your soap making process.
Oxide Color Range and Blending Techniques

A rainbow of possibilities awaits you with mineral oxides in soap making. The oxide color range spans from deep reds to rich browns and striking blacks, offering you intense, stable hues for your creations.
When you're ready to blend these vibrant pigments, mix 1 teaspoon of colorant with 1 tablespoon of lightweight oil to prevent clumping.
Master these essential blending techniques to create custom shades:
- Combine red and yellow oxides for a brilliant orange
- Keep mineral oxide quantities under 5-6 teaspoons per pound of soap
- Test small batches to account for pH variations
Before diving into full batches with your mineral oxides, remember to experiment with different combinations. The final color can vary depending on your soap's ingredients, so starting small helps you achieve precisely the shade you're aiming for.
Proper Oxide Measurements and Ratios

Precise measurements make the difference between vibrant, professional-looking soaps and muddy, inconsistent results. For cold process soap, you'll want to start with a basic ratio of 1 teaspoon of mineral oxide to 1 tablespoon of lightweight oil. This creates a smooth dispersion that'll blend seamlessly into your soap mixture.
Keep in mind that you shouldn't exceed 5-6 teaspoons of mineral oxides per pound of soap. If you're working with melt-and-pour soap, cut these oxide measurements in half and use glycerin or isopropyl alcohol instead of oil for dispersion.
Don't skip testing small batches first – it's essential for understanding how your chosen oxides will behave in your specific formula. When you're ready to mix, incorporate your oxide dispersion thoroughly at trace to prevent unwanted speckling.
Mixing Methods for Even Color Distribution

You'll achieve the smoothest color distribution by first mixing your mineral oxide with a lightweight carrier oil, using the standard ratio of 1 teaspoon oxide to 1 tablespoon oil.
When you've reached trace in your soap mixture, gradually add your pre-mixed oxide while stirring continuously to prevent any unwanted clumping.
For the most uniform results, use your stick blender to thoroughly incorporate the color throughout your soap batter, ensuring every portion displays consistent pigmentation.
Pre-Mix With Carrier Oil
One of the most effective methods for incorporating mineral oxides into your soap is pre-mixing them with a carrier oil. Using a ratio of 1 teaspoon of oxide to 1 tablespoon of carrier oil, you'll achieve better dispersion and prevent those pesky clumps that can ruin your soap's appearance.
Key tips for successful pre-mixing:
- Choose skin-friendly carrier oils like sweet almond or avocado oil
- Always use cosmetic-grade mineral oxides for safety
- Start with small test batches to understand color intensity
When you're ready to color your soap, gradually add your pre-mixed oxide solution at trace. This technique guarantees even distribution throughout your batter, resulting in vibrant, uniform colors.
Blend Using Stick Blender
While pre-mixing oxides with carrier oils creates a solid foundation, using a stick blender takes your color distribution to the next level. When you blend using stick blender, you'll achieve seamless color integration and prevent those pesky clumps that can ruin your soap's appearance.
| Action | Purpose |
|---|---|
| Disperse first | Prevents oxide clumping |
| Blend gradually | Controls color intensity |
| Mix at trace | Guarantees even distribution |
| Watch timing | Avoids air bubbles |
| Test small | Perfect your technique |
Start by adding your pre-mixed mineral oxides to your soap batch at trace. Use short bursts with your stick blender rather than continuous mixing to maintain control. You'll want to slowly incorporate the colorant while monitoring the shade development. Remember to test different amounts in small batches first – this helps you perfect your technique before scaling up to larger productions.
Common Troubleshooting for Oxide Coloring
Despite their reliability as natural colorants, mineral oxides can present several common challenges that require careful attention during the soap-making process.
You'll encounter speckling if you don't properly disperse the oxide by mixing 1 tsp with 1 tbsp of oil before adding it to your soap. For ideal color stability, monitor pH levels and use only cosmetic-grade oxides.
Here's what you'll need to watch for:
- Clumping in cold-process soap – always pre-mix oxides with oil
- Color changes during curing – store finished soaps in a cool, dark place
- Fading issues – stay within 5% usage rate of total soap weight
If you're aiming for deeper colors, you can gradually increase the oxide amount, but remember to maintain proper dispersion to avoid those pesky speckles in your final product.
Storage and Shelf Life of Oxide-Colored Soaps
To preserve the vibrant colors of your oxide-colored soaps, you'll need to store them in a cool, dry place away from direct sunlight and excessive moisture.
Your soaps will maintain their quality for 6 months to a year when you keep them in opaque or UV-resistant containers that protect against environmental damage.
You should regularly inspect your soaps for any signs of discoloration or oxidation, especially if you've used natural oils in your formulation.
Optimal Storage Conditions Required
Since proper storage plays a vital role in preserving oxide-colored soaps, you'll need to maintain specific conditions to protect your products.
Keep your soaps in a cool environment between 60°F to 75°F, and shield them from direct sunlight to prevent color fading. High humidity can trigger unwanted saponification and compromise your soap's color integrity, so it's important to store them in a dry space.
To maintain your oxide-colored soaps' quality, follow these key practices:
- Use airtight containers to minimize exposure to moisture and air
- Store your soaps in a temperature-controlled area away from windows and heat sources
- Monitor your stored soaps regularly for any signs of discoloration or texture changes
Color Preservation Over Time
While many natural soap colorants fade quickly, mineral oxide pigments offer remarkable color stability that can last for months or even years.
You'll find that proper storage is key to maintaining your oxide-colored soaps' vibrant appearance over time.
To guarantee peak color preservation, keep your soaps in airtight containers away from direct sunlight, as UV exposure can cause colors to fade or morph.
Store them in a cool, dry environment to prevent moisture absorption that could affect their appearance.
Though oxide pigments are highly stable, they're not completely immune to environmental factors.
Make it a habit to check your stored soaps periodically for any color changes.
With proper care and protection from light and air exposure, you'll enjoy the lasting beauty of your oxide-colored soaps for an extended period.
Preventing Environmental Color Damage
Although mineral oxide colorants are highly stable, proper storage practices remain essential for preserving your soap's vibrant hues.
To store oxide-colored soaps effectively, choose a cool, dark location and use opaque containers to prevent light damage. You'll also want to avoid areas with high humidity or heat, as these conditions can compromise both the soap's structure and color integrity.
Key storage practices to prevent color fading:
- Keep your soaps away from direct sunlight and artificial light sources
- Store in a temperature-controlled environment, away from heating vents or appliances
- Use airtight, opaque containers to protect against moisture and light exposure
Remember to inspect your stored soaps regularly for any signs of deterioration and rotate your stock to maintain freshness.
With proper storage, you'll greatly extend the lifespan of your colorful creations.
Testing and Documentation Procedures
Before diving into full-scale soap production with mineral oxides, you'll need to establish reliable testing and documentation procedures to confirm consistent results.
Start by creating small test batches, carefully measuring and recording the exact amounts of mineral oxides used in relation to your total soap weight.
Keep detailed notes of how colors develop throughout the process, from initial mixing to trace, and through the final cure. You'll want to document any color changes that occur during these stages.
Take clear photographs of your finished soaps and create a reference chart that pairs these images with your recipe notes.
Don't forget to monitor and record how your colors hold up over time, particularly noting any changes from light exposure or pH variations.
This systematic approach confirms you can replicate successful results consistently.
Advanced Color Design With Multiple Oxides
Once you've mastered working with individual mineral oxides, mixing multiple oxides opens up endless color possibilities for your soaps.
Begin by pre-mixing each oxide with lightweight oil in a 1:1 ratio to prevent clumping and guarantee even distribution. When combining different mineral oxides, you'll want to test small batches first, as certain combinations might create unexpected results.
Pre-mix oxides with oil to avoid clumping, then test small batches when combining colors to perfect your soap's unique look.
For successful multi-oxide designs, follow these essential tips:
- Start with small amounts and gradually increase concentrations up to 5-6 teaspoons per pound of soap
- Document your combinations and results to replicate successful color blends
- Store finished soaps away from direct sunlight to maintain color stability
Remember that cold process and melt-and-pour soaps may react differently to oxide combinations, so adjust your formulations accordingly based on your chosen method.
Frequently Asked Questions
How Much Titanium Dioxide Is in CP Soap?
You'll want to use 1 teaspoon of titanium dioxide per pound of oils in your CP soap. Mix it with water or light oil in a 1:3 ratio before adding to prevent clumping.
How to Safely Color Soap?
You'll need to pre-mix mineral oxides with lightweight oil (1:3 ratio), keep colorants under 5% of total soap weight, and test small batches first. Always use cosmetic-grade oxides for skin safety.
How Much Oxide Do You Add to Soap?
You'll need 1-2 teaspoons of oxide per pound of soap for standard colors. Mix it with 1 tablespoon of light oil first. For melt-and-pour soaps, use half this amount and disperse in glycerin.
How to Get Vibrant Colors in Cold Process Soap?
Mix 1 teaspoon of mineral oxide with 1 tablespoon of oil before adding to your soap at trace. You'll get vibrant colors by combining different oxides and clays. Don't exceed 6 teaspoons per pound.
In Summary
You've now mastered the art of coloring soaps with pure mineral oxides. By following proper safety protocols, measurement techniques, and mixing methods, you'll create vibrant, natural colorants for your soap creations. Remember to document your successful combinations and keep testing new oxide blends. With practice and patience, you'll develop your own signature palette that sets your handmade soaps apart from commercial products.


Leave a Reply