To safely render lard for soap, you'll need to start with quality pork fat, preferably leaf lard from heritage breeds. Cut the cleaned fat into 1-inch cubes, then heat slowly at 194°F in a slow cooker or double boiler. Stir every 15-20 minutes until the fat liquefies to a pale yellow color. Strain through cheesecloth, cool to room temperature, and store in sterilized glass jars. Following proper safety steps guarantees your rendered lard creates superior homemade soap.
Selecting Quality Pork Fat Sources
The journey to making quality soap begins with sourcing the right pork fat. You'll want to focus on leaf lard, the premium fat found around the kidneys, as it produces the cleanest and highest quality results for your soap making.
When selecting animal fats, choose those from pasture-raised pigs, particularly heritage breeds, as they offer superior nutrient content with higher omega-3 fatty acids. For the creamiest soap texture, look for fatback from specialized lard breeds.
Before rendering lard, carefully inspect your chosen fat for any spoilage signs – it should have a neutral scent without discoloration or blemishes.
To secure quality fat consistently, build relationships with local farmers and butchers who raise heritage breeds. They're often your best source for fresh, clean fat that'll yield exceptional soap-making results.
Essential Tools and Equipment Setup
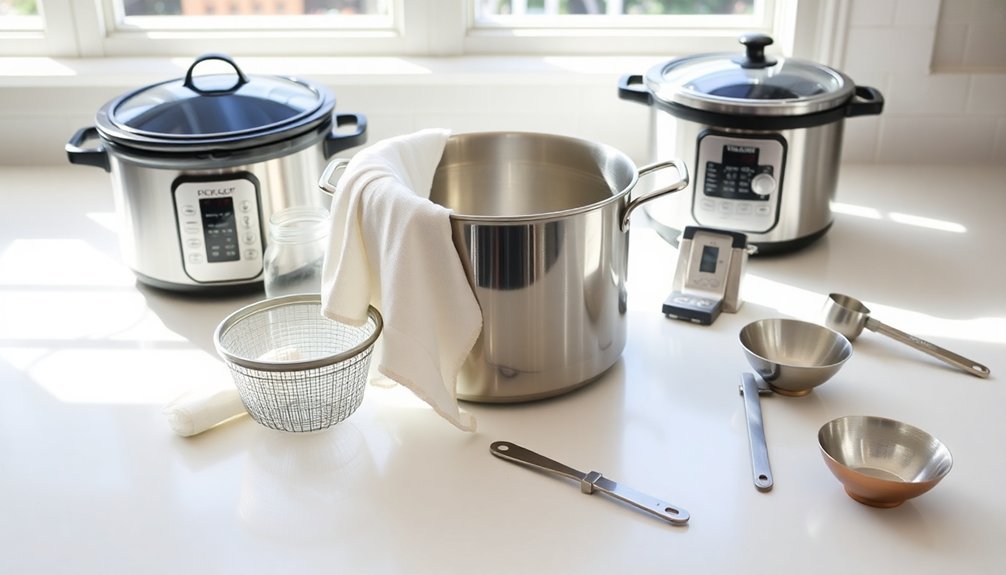
Before diving into the rendering process, you'll need to gather and properly arrange specific equipment to guarantee safe, efficient lard production.
Start by setting up your slow cooker or double boiler, which will help you maintain the steady, low temperature needed to render lard without burning.
A slow cooker or double boiler maintains the precise, gentle heat essential for perfect lard rendering without scorching.
Position your digital scale nearby to accurately measure fat and water ratios. You'll also want a reliable thermometer to monitor temperatures, keeping them around 194°F for ideal results.
Place a fine mesh strainer or cheesecloth within easy reach for filtering the rendered lard later. Choose stainless steel containers for mixing and storing, as they won't react with the fat during the process.
Arrange these tools in a logical workflow sequence, ensuring everything's readily accessible when you need to measure, render, strain, and store your finished product.
Proper Workspace Preparation and Safety
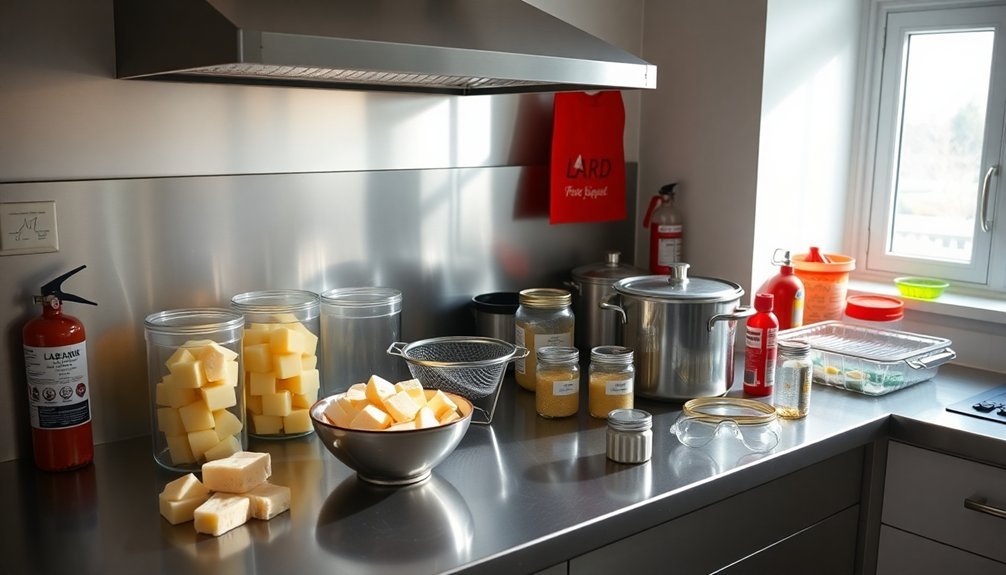
With your equipment ready, preparing a safe workspace becomes your next priority. You'll need to focus on proper ventilation by opening windows or using fans to manage fumes during the rendering process. Don protective gear, including long sleeves, gloves, and goggles, to prevent burns from hot fat.
| Safety Element | Required Action |
|---|---|
| Workspace preparation | Clear area, guarantee ventilation |
| Protective gear | Wear gloves, goggles, long sleeves |
| Container selection | Use stainless steel or heavy-duty plastic |
| Measuring accuracy | Employ digital scale for lye |
| Access control | Keep children and pets away |
Select appropriate containers made of stainless steel or heavy-duty plastic to avoid chemical reactions when mixing lye and fat. Never use aluminum or non-stick materials. Measure your lye precisely using a digital scale, and keep children and pets away from your workspace to prevent accidents.
Cutting and Preparing Fat for Rendering
You'll need to thoroughly wash and dry your fat pieces before beginning the rendering process, removing any debris or unwanted tissue.
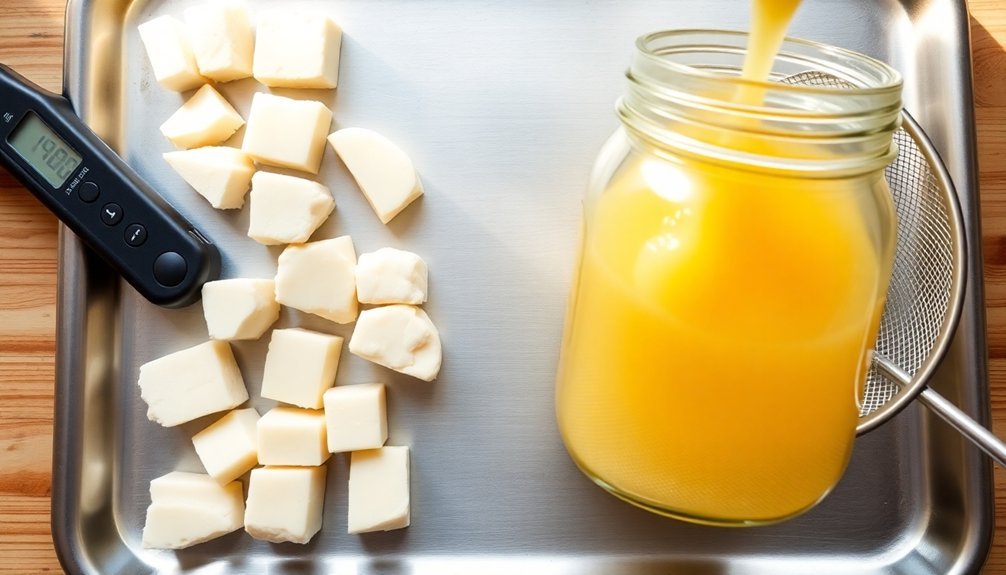
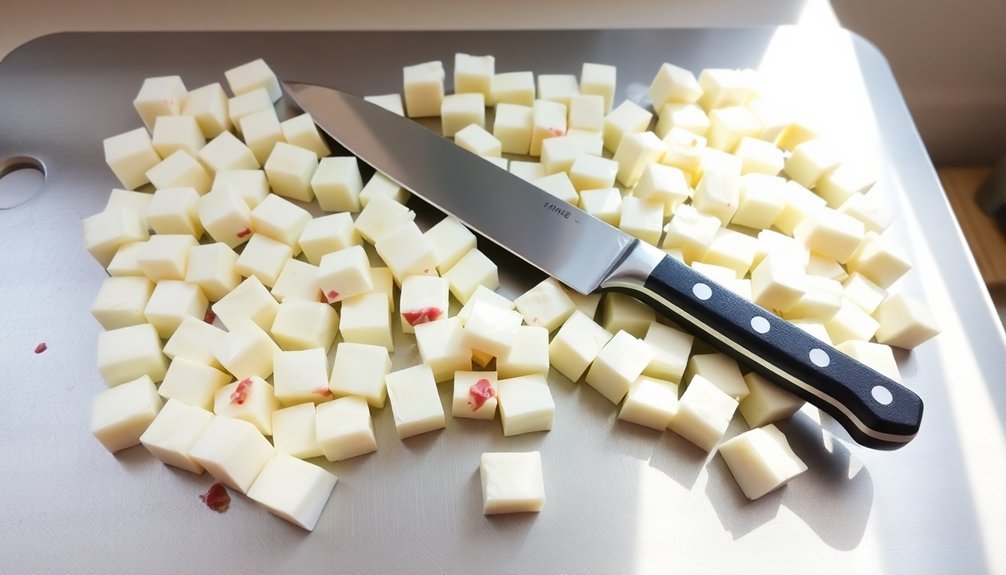
Cut your cold fat into uniform 1-inch cubes or use a food processor to create smaller pieces, as consistent sizing guarantees even melting and ideal results.
Keep your fat at a cool temperature while working with it, and remember that proper temperature control throughout the preparation phase sets you up for successful rendering later.
Clean Fat Before Processing
Proper preparation of your fat is essential before starting the rendering process. You'll want to verify your fat is fresh and thoroughly clean before rendering. Start by rinsing the fat under cold water to remove any impurities or blood traces.
Cut the fat into small, uniform pieces about 1-inch in size. This consistent sizing helps achieve even melting and prevents burning during rendering. If you're working with leaf fat, make sure to trim away any connective tissue or meat scraps for a purer final product.
You can use a sharp knife or food processor to create these uniform pieces, but don't cut them too small, as this can lead to excessive browning. Until you're ready to begin rendering, refrigerate your cut fat to maintain its quality and prevent spoilage.
Proper Cutting Size Matters
Cutting your fat into correctly-sized pieces is a critical step that can make or break your rendering process. You'll want to aim for small pieces about 1-inch in size to guarantee proper cutting size and uniform cooking. This approach promotes even melting and helps impurities escape more effectively.
| Size Guide | Benefits | Results |
|---|---|---|
| 1-inch cubes | Even melting | Cleaner product |
| Ground pieces | Faster rendering | Better efficiency |
| Uniform cuts | Consistent heat | No burning |
| Small chunks | Quick processing | Quality lard |
Don't be tempted to rush this step by leaving large chunks, as they'll only create problems later. When you take time to cut fat pieces precisely, you'll achieve a cleaner final product and reduce your overall rendering time. Remember, consistent sizing is key to successful soap-making.
Temperature Control For Success
Now that you've mastered the art of proper fat sizing, maintaining the right temperature becomes your next priority.
Temperature control is essential for successful rendering and producing high-quality lard for your soap making.
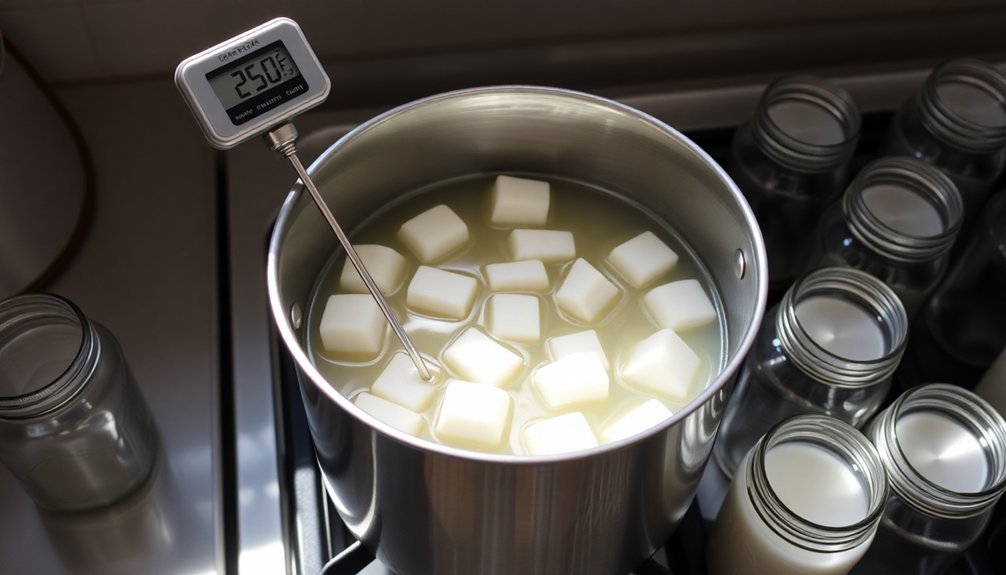
You'll want to keep your cooking temperature at around 90°C (194°F) to guarantee even melting and proper fat separation.
Start by adding 1/4 cup of water to your fat – this creates a buffer that prevents burning and promotes gentler heating.
Remember to stir the mixture every 10-20 minutes throughout the rendering process to maintain consistent results.
As you monitor the safe steps, watch for any signs of overheating, which can introduce unpleasant odors and undesirable flavors into your final product.
Temperature Control and Heating Methods
Successful lard rendering depends heavily on maintaining the right temperature throughout the process.
You'll want to keep your temperature control steady at around 90°C (194°F) to prevent unwanted flavors from developing. Using a slow cooker or double boiler provides controlled heating that's ideal for rendering lard safely and effectively.
To prevent burning, start by adding 1/4 cup of water to your fat and stir every 10-20 minutes during the melting phase.
You'll need to monitor the fat closely, as proper temperature is essential for quality results. Low heat is your friend here – if you rush the process with higher temperatures, you risk developing an unpleasant piggy smell and compromising your final product.
The key is patience and consistent temperature management throughout the rendering process.
Monitoring the Rendering Process
The three key indicators of properly rendering lard are temperature, color, and consistency. To guarantee quality results, you'll need to monitor the temperature throughout the rendering process, maintaining it at around 90°C (194°F). This prevents unwanted strong flavors from developing.
Keep an eye on your mixture by stirring every 10-20 minutes to promote even melting and prevent sticking. You'll know the fat has fully melted when it transforms into a pale yellow liquid, indicating minimal impurities.
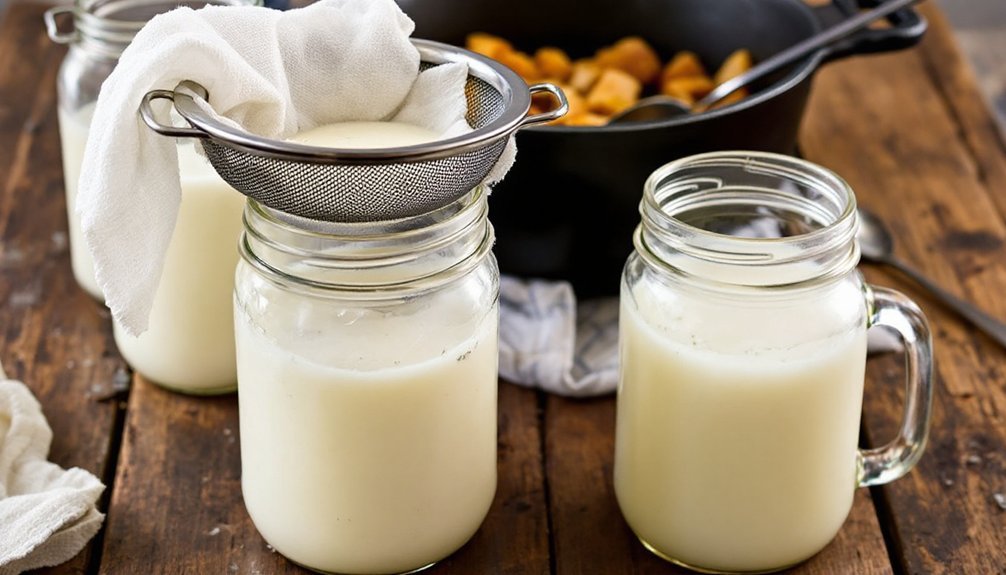
At this point, strain the liquid fat through a fine mesh strainer or cheesecloth to separate it from the cracklings.
The yield from your rendering process will typically be 50-60% of your initial fat weight, though this can vary depending on the type and quality of fat you're using.
Straining and Purifying Liquid Lard
Once your lard has finished rendering, you'll need to strain it carefully through multiple layers of cheesecloth or a fine coffee filter to remove any remaining solids.
Let the liquid fat cool slightly before you begin straining to protect yourself from burns and achieve better results.
For ideal filtration, line a fine mesh colander with cheesecloth and slowly pour the rendered lard through it.
If you notice your liquid fat is still cloudy or contains visible impurities, gently reheat it and strain again. This extra step will help guarantee a clear, high-quality final product.
To maintain maximum shelf life, pour your strained lard into sterilized glass jars while it's still warm.
This helps create a proper seal and keeps your rendered lard fresh for soap-making projects.
Cooling and Storage Techniques
Properly cooling and storing your rendered lard will determine its longevity and quality for soap making.
Let your rendered lard cool to room temperature in the pot before transferring it to storage containers – this prevents unwanted condensation and spoilage.
Allowing rendered lard to reach room temperature before storage helps prevent moisture buildup that could compromise its quality.
For long-term shelf life, pour hot lard into scalded glass jars and seal them immediately. You'll know you've achieved good quality if your lard has a pale yellow color; darker shades suggest it was rendered from cracklings, which might affect your soap's properties.
For convenient portioning, freeze lard in ice cube trays.
Your storage options affect preservation time: refrigerated lard lasts about a month, while frozen lard maintains quality for 6-12 months.
Choose your storage method based on how quickly you'll use your lard in soap making projects.
Testing Lard Quality for Soap Making
Before using rendered lard in your soap recipes, testing its quality guarantees successful saponification and prevents unwanted results in your final product.
Start by sourcing high-quality pig fat, preferably leaf lard, which offers superior properties for soap making.
You'll want to examine the lard's color, which should be white to pale yellow, indicating proper rendering.
Perform a smell test to check for any off-putting odors – quality rendered lard should have a mild, neutral scent.
Drop a small amount into cold water; if it maintains its shape and sinks, you've got good lard for soap making.
Don't skip the essential step of straining your rendered lard through a coffee filter or cheesecloth to remove impurities that could compromise your soap's quality.
Cleaning and Maintaining Equipment
The three most vital aspects of equipment care in lard rendering start with keeping dedicated equipment separate from your regular kitchen items.
You'll need non-reactive materials like heavy-duty plastic or stainless steel containers to prevent contamination and maintain safety throughout the process.
Follow these important cleaning steps:
- Clean all equipment with hot, soapy water immediately after use.
- Use a baking soda solution for cleaning surfaces and neutralizing odors.
- Rinse tools used with lye thoroughly after each use.
- Store rendered lard in scalded glass jars, sealing them while hot.
Don't skip these maintenance practices, as they're essential for both safety and quality.
Your diligence in cleaning and storing equipment properly will guarantee your soap-making process remains contamination-free and your finished products maintain their quality.
Frequently Asked Questions
How to Render Lard for Soapmaking?
Cut pig fat into small pieces, add water, and melt slowly in your slow cooker. Stir every 15 minutes until fully melted. Strain through cheesecloth, then pour into jars to cool completely.
Is Lard Soap Safe?
Yes, lard soap is safe when properly made. You'll find it's gentle on your skin since the saponification process neutralizes the lye, creating a mild soap with moisturizing properties that's suitable for everyday use.
How Do You Render Lard?
Cut fat into small pieces, add water, and place in a slow cooker on low heat. Stir occasionally while it melts. Once liquid, strain through cheesecloth. Let it cool, then store in sealed jars.
How Long Does Lard Soap Need to Cure?
You'll need to cure your lard soap for 4-6 weeks in a cool, dark place. Turn the bars weekly for even drying, and test the pH before use to guarantee it's safe for your skin.
In Summary
With these steps, you'll have successfully rendered high-quality lard that's perfect for soap making. Remember to label and date your containers, store them in a cool, dark place, and use the lard within 6-12 months for best results. By following proper safety measures and maintaining cleanliness throughout the process, you've created a sustainable, natural ingredient for your homemade soaps.


Leave a Reply