
Start with hardwood ashes from maple, oak, or hickory for the highest potassium content. You'll need to sift your ashes thoroughly to remove unburnt chunks and create a proper leaching station using a raised barrel with drainage holes. Keep your water-to-ash ratio at 1:1, using rainwater when possible. Test your lye's strength by floating an egg in the solution. Finally, store your finished lye in airtight containers – but there's much more to mastering this traditional craft.
Selecting and Preparing Quality Wood Ash

When making wood ash lye, your success hinges on starting with high-quality hardwood ashes. You'll want to use species like hickory, maple, or oak because they produce higher concentrations of potassium hydroxide in your final product.
To prepare quality wood ash for the leaching process, you'll need to sift your ashes thoroughly using a flour sifter. This removes unburnt chunks and guarantees better water absorption later.
Check for any remaining carbon particles, as these impurities can affect your lye making. You'll also want to store your sifted ashes in a dry container since moisture can trigger premature lye formation.
When you're ready to begin, create a depression in your ash pile – this simple step improves water absorption and enhances the extraction process considerably.
Setting Up Your Safe Leaching Station
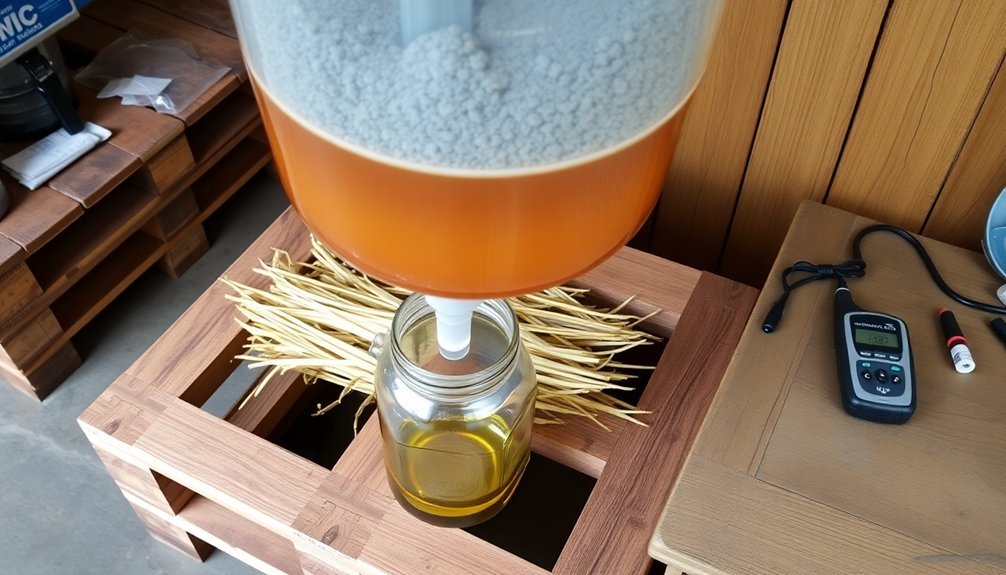
Three key components make up a proper leaching station: your container, drainage system, and collection setup.
You'll need a wooden or steel leaching barrel with pre-drilled holes for ideal drainage. Elevate your barrel to allow space for a collection system underneath.
Start your setup by creating a drainage base with pea gravel, then add a straw layer to filter impurities.
Set a strong foundation with pea gravel first, followed by straw – these essential filtration layers ensure a cleaner end product.
Pour your hardwood ashes on top, making a depression in the center. Using rainwater or snowmelt will maximize your lye solution's potency during extraction.
Remember, the leaching process requires patience – it can take several hours or even days for water to fully permeate the ashes.
Keep safety in mind by positioning your collection system securely under the elevated barrel to catch every drop of the lye solution.
Mastering the Water-to-Ash Ratio

With your leaching station properly set up, achieving the right water-to-ash balance becomes your next focus. You'll want to maintain a 1:1 water-to-ash ratio for ideal lye extraction, though you'll start with 12-20 cups of water for better yield. Using rainwater or snowmelt instead of hard tap water will improve your solution's effectiveness.
| Volume | Water Type | Expected Results |
|---|---|---|
| 1:1 ratio | Soft water | Ideal extraction |
| 1:1 ratio | Hard water | Reduced yield |
| 12 cups | Rainwater | Good baseline |
| 20 cups | Snowmelt | Maximum yield |
Create your slurry by mixing the ashes and water until you've achieved a thin milkshake consistency. Make sure your ashes are fully saturated, then let your solution rest overnight. This waiting period is essential for proper lye extraction and helps separate sediment for your soap making project.
Testing Lye Strength and Concentration
How do you know if your wood ash lye is strong enough for soap making? You'll need to test your alkaline solution using reliable methods.
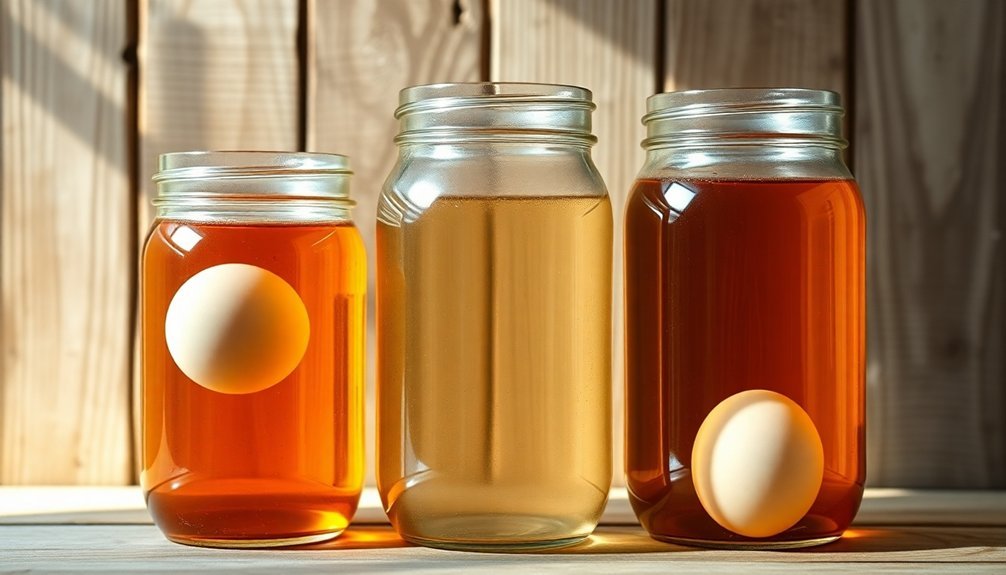
The simplest approach is to float an egg – if it surfaces in your homemade lye, you've achieved proper concentration. For more precision, measure the specific gravity, which should approach 1.2, similar to saturated salt water.
You can also drop a chicken feather into your solution; if it dissolves, your lye strength is sufficient.
When working with wood ash, remember that older ashes might contain potassium carbonate instead of potassium hydroxide, affecting your results.
For long-term storage, try evaporating lye solution to form crystals – this helps confirm proper concentration.
These testing methods guarantee your wood ash lye meets the strength requirements for successful soap making.
Storing and Preserving Your Wood Ash Lye

Once you've produced a strong wood ash lye solution, proper storage becomes vital for maintaining its effectiveness. Store your wood ash lye in an airtight container, like a mason jar, to prevent contamination and preserve its potency.
Store wood ash lye in a sealed mason jar to maintain its strength and keep out impurities.
Keep your solution in a cool, dry place away from direct sunlight. If you're planning for long-term storage, consider evaporating the lye solution to create solid lye crystals, which will last indefinitely when properly sealed.
Remember to check your stored lye regularly for any signs of moisture or impurities that could compromise its soap-making qualities.
Safety remains essential when handling stored lye, as it's still highly caustic. Always wear protective gloves and goggles when working with your lye solution to prevent burns and irritation from accidental contact.
Frequently Asked Questions
How to Use Wood Ash to Make Lye?
You'll need to sift wood ash, mix it with distilled water, let it settle overnight, pour off the clear liquid, and boil until it thickens. Always wear safety gear and test pH before use.
Does Wood Ash Turn to Lye When Wet?
When you wet wood ash, it doesn't directly turn into lye. Instead, water leaches out potassium hydroxide (lye) that's already present in the ash. It's an extraction process, not a transformation.
What Happens When You Mix Wood Ash, and Water?
When you mix wood ash and water, you'll create a caustic solution that releases sodium hydroxide (lye). The mixture turns milky, and after settling, you'll get a strong alkaline liquid that's traditionally used for soapmaking.
How to Make Wood Ash Solution?
You'll need to sift white ash through a flour sifter, mix it with distilled water until it's like a thin milkshake, then let it settle overnight. Pour off the clear liquid carefully.
In Summary
You've now learned the essential steps for making wood ash lye safely and effectively. Remember to choose clean hardwood ash, set up a proper leaching station, maintain the correct water ratio, test your solution's strength, and store it appropriately. With these guidelines, you'll be able to create quality lye for your soap making, cleaning, or homesteading projects. Just follow proper safety precautions, and you're ready to start.


Leave a Reply