To cure soap successfully in your basement, control humidity at around 45% with a dehumidifier to prevent soggy bars. Maximize airflow using strategically placed fans and breathable storage setups. Protect your creations from dust with light cloth covers or paper towels. Use rust-resistant metal racks positioned away from sunlight and dampness. Monitor your soap by weighing regularly and tracking cure dates. These simple adjustments transform your basement into an ideal soap-curing environment.
5 Tips: Curing Soap Successfully in Basements
While basements provide perfect spaces for curing homemade soap, they require proper setup to guarantee peak results.
You'll need to maximize airflow around each bar to enhance moisture evaporation—never store soap in airtight containers.
Utilize vertical space efficiently with shelves or racks, and keep bars organized so they don't touch.
Label each batch with dates and recipe details for tracking. Protect your soap from dust with mesh cloth and avoid direct sunlight.
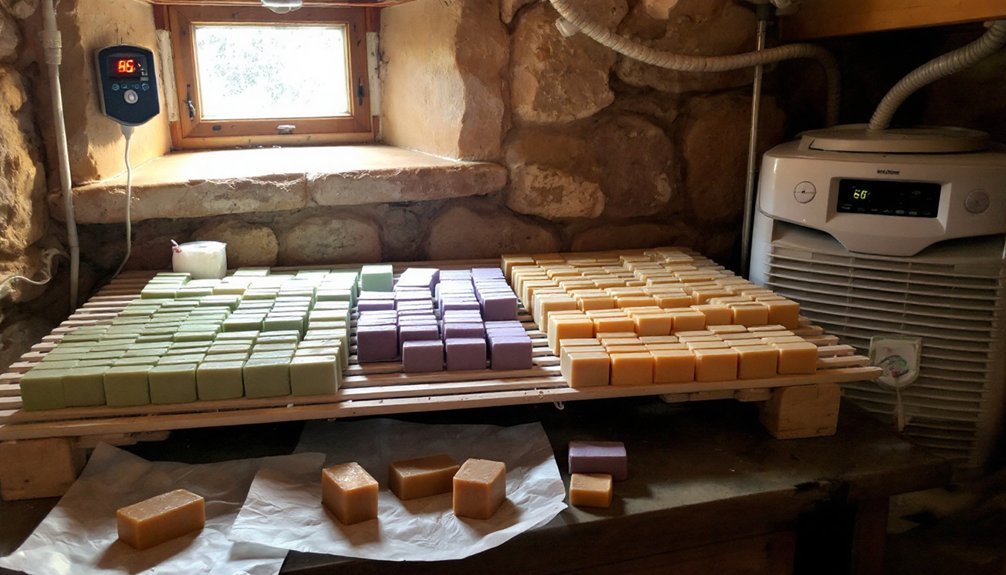
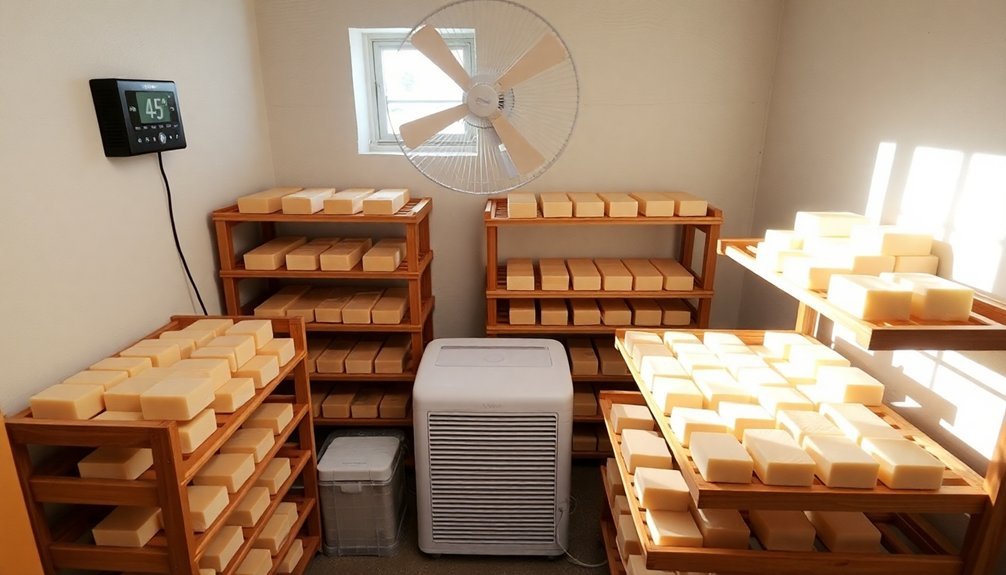
Maintain consistent temperature and control humidity—consider using a dehumidifier if your basement tends to be damp. The optimal temperature range of 60°F to 80°F creates ideal curing conditions for your soap bars.
Line shelves with grease-proof paper to prevent sticking. Regularly weigh and inspect your bars to monitor moisture loss and check for mold or uneven drying.
Different scented soaps should be stored separately to prevent scent mixing.
Creating an Optimal Humidity Environment With Dehumidifiers
Because proper humidity control directly impacts soap quality, investing in a good dehumidifier can make all the difference in your basement curing space. Aim to maintain humidity levels around 45% to prevent soggy soap, rancidity, and extended curing times that can stretch from 4-6 weeks to 8-10 weeks in damp conditions.
When selecting a dehumidifier, consider your basement's size and your budget for both purchase and operation costs. For smaller spaces, desiccant products like Damp Rid offer electricity-free alternatives. Many soapmakers have found that DampRid products effectively absorb excess moisture when placed near soap storage areas.
Position your dehumidifier strategically to maximize effectiveness, especially near cool walls where condensation forms. Don't forget to implement proper drainage systems to manage collected moisture.
Regular monitoring is essential—excessive humidity alters fat composition, potentially resulting in less moisturizing soap with off smells and discoloration.
Maximizing Airflow in Limited Basement Spaces

How can you effectively create circulation in a space that's naturally resistant to airflow? Start by strategically positioning fans away from walls in areas where air tends to stagnate. For soap curing, this targeted approach prevents moisture pockets that can affect your bars.
Consider installing additional windows if possible—egress or awning styles provide both safety and improved ventilation. Position your curing racks to take advantage of natural airflow paths.
Don't overlook your HVAC system; adjusting registers and dampers can greatly improve circulation throughout your basement workspace. Integrating air purifiers with HEPA filtration will significantly reduce airborne particles that might settle on your curing soap. Keep pathways clear around ventilation devices and check them regularly.
Remove dust from fan blades and replace filters according to manufacturer guidelines. Remember that furniture placement considerably impacts airflow—arrange your soap curing station where it won't be trapped in dead zones.
Protecting Your Soap From Basement Dust and Contaminants
Three invisible enemies threaten your curing soap in basement environments: dust, allergens, and airborne contaminants.
Basements naturally collect more dust and cobwebs than other areas of your home, which can easily settle on your soap during curing.
Install HEPA air filters to reduce ambient dust and improve air quality. Clean your workspace thoroughly before handling soap to prevent transferring dirt.
Cover your curing soaps lightly with paper towels or breathable cloth, ensuring you don't restrict essential airflow.
For additional protection, consider wrapping your soap after curing. Different soap types require different materials—plastic wrap works well for melt and pour varieties to prevent glycerin dew, while breathable options suit cold process soaps better. Consider using bakers racks for improved airflow during the curing process in basement environments.
Regular cleaning of your basement space will greatly reduce contamination risks.
Setting Up Proper Storage Racks for Even Curing

Proper storage rack setup forms the foundation of successful soap curing in basement environments.
Choose metal racks with rust-resistant coating to prevent soap contamination and rancidity. Position your racks in cool, dry areas away from direct sunlight, elevating them to avoid floor moisture.
Arrange soap bars with space between each to maximize airflow on all sides. In humid basements, use fans to enhance air circulation. Baker's racks are ideal for cold process soap curing as they promote optimal airflow during the 4-6 week curing period.
For small spaces, consider wall-mounted or behind-door racks to utilize vertical storage efficiently.
Your shelves should be easily accessible for regular rotation and monitoring. Adjustable shelving offers flexibility for different soap sizes and quantities.
Remember that proper curing takes 4-6 weeks, so durability matters—ensure your racks can support multiple batches of soap throughout this process.
Frequently Asked Questions
How Long Does Soap Need to Cure in Basement Conditions?
You'll need four to six weeks to cure soap in your basement, but it may take longer due to higher humidity and lower ventilation. Use dehumidifiers and fans to improve airflow for best results.
Will Basement Curing Affect Soap Scents or Colorants?
Yes, basement curing can affect your soap. Low light helps preserve colorants, while stable temperatures help retain scents. You'll want to monitor humidity though, as excessive moisture can impact both elements.
Can I Cure Different Soap Types Together in the Same Area?
Yes, you can cure different soap types together in the same area. Just confirm each type has its own space, monitor their specific cure times, and maintain good air circulation between all your soaps.
Does Basement Soap Curing Require More Frequent Rotation Than Upstairs?
Yes, you'll need to rotate your soap more frequently in basement settings. The higher humidity and reduced airflow can cause uneven curing, so turning bars every 2-3 days will guarantee consistent results.
How Can I Test if Basement-Cured Soap Is Ready for Use?
You'll know your basement-cured soap is ready when it passes these tests: weight has stabilized, feels firm to touch, lathers well, smells normal, and shows no moisture. Use a scale for confirming weight stability.
In Summary
Your basement can be a fantastic soap curing space when you manage humidity, maximize airflow, protect from contaminants, and use proper storage racks. Don't let the challenges discourage you—with these five tips, you'll transform your basement into an ideal soap workshop. Remember, successful curing takes patience, but you'll be rewarded with perfectly hardened, long-lasting bars that any soap maker would be proud of.


Leave a Reply