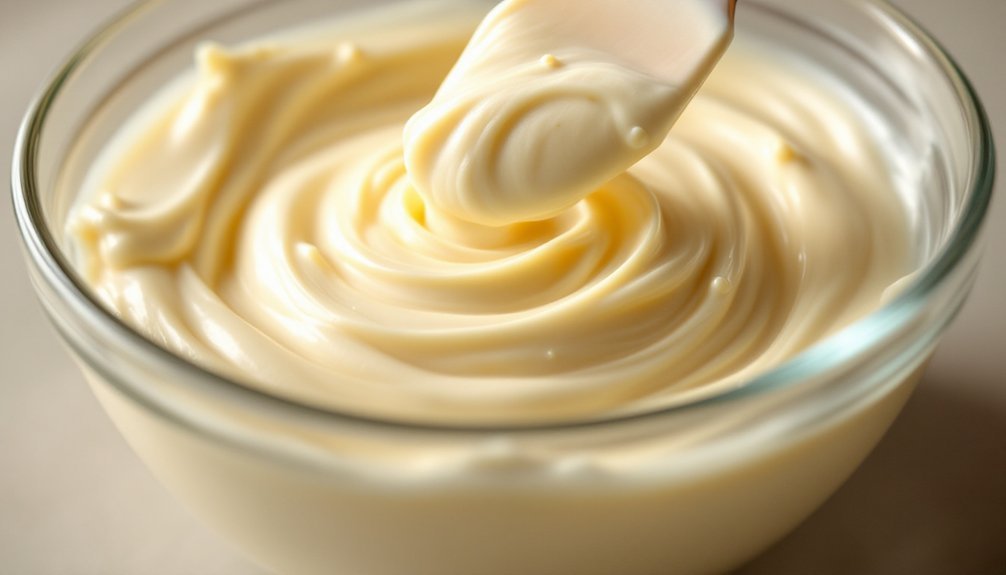
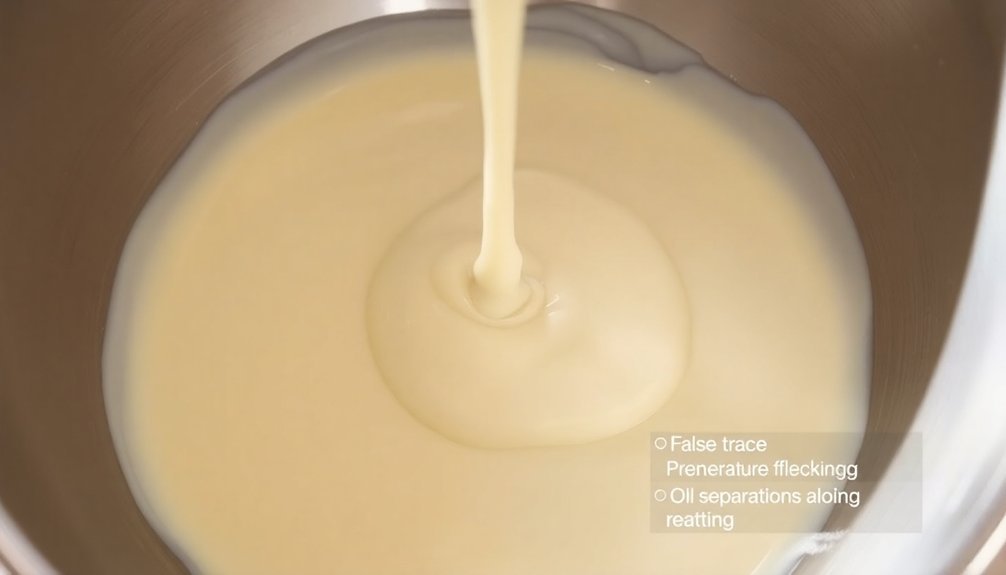
Perfect soap trace looks like thin pudding with a smooth, cohesive consistency. When you drizzle the mixture over itself, it leaves a visible trail that sits briefly on the surface before sinking in. It's neither too runny nor too thick, similar to medium-bodied frosting. You'll know you've achieved proper trace when the mixture holds its shape slightly and feels evenly emulsified throughout. Understanding these key indicators will transform your soap-making results.
What Does Perfect Soap Trace Look Like?
When you're making soap, achieving the perfect trace is essential for successful results.
You'll know you've reached this point when your mixture develops a thin pudding consistency that's just thick enough to work with but not so thick that pouring becomes difficult.
At perfect trace, your soap batter should be completely homogenous with no oil separation visible—a clear indication that saponification is actively occurring.
Try this simple test: drizzle some soap across the surface with a spoon. If it leaves a clear trail that briefly sits on top before disappearing, you've achieved proper emulsification.
The ideal temperature range for perfect trace is between 100-130°F.
Monitor both your oils and lye carefully, as balanced temperatures contribute greatly to reaching that ideal consistency.
Defining Soap Trace: The Science Behind Emulsification
When your oils and lye solution meet, they initiate a chemical reaction called saponification, transforming these separate ingredients into soap molecules through emulsification.
You'll recognize this critical junction point when your mixture begins to thicken, indicating molecular bonds are actively forming between fatty acids and the alkali solution.
This transformation creates a stable emulsion where oil and water components, normally repellent to each other, become permanently bound through newly formed soap molecules.
Chemical Reaction Process
At the heart of successful soap making lies the critical moment called "trace" – the visible confirmation that saponification has begun. This chemical reaction occurs when your lye solution meets the fatty acids in your oils, triggering a transformation that creates soap.
When you're stirring your soap batter, you're actively encouraging these molecules to interact. As saponification progresses, the mixture becomes emulsified, preventing oils and lye from separating.
You'll notice the consistency changing—from thin and fluid to increasingly thick as the process advances.
The soap trace you're looking for happens at different speeds depending on your recipe and technique. Some oil combinations trace quickly, while others take longer to reach that perfect emulsified state.
Recognizing this moment guarantees your additives will blend properly and your soap will cure correctly.
Oil-Lye Junction Point
The precise meeting point between oils and lye solution represents the foundation of successful soapmaking. This critical junction, known as "trace," marks when your mixture has properly emulsified and saponification has begun.
You'll recognize it when your soap batter thickens and leaves a visible trail when drizzled across the surface.
Trace varies in consistency from thin (like cake batter) to thick (resembling pudding), affecting how and when you incorporate additives and colorants.
Be wary of false trace, where your mixture appears thick but hasn't fully emulsified. This can lead to unsaponified lye in your final product, potentially causing skin irritation.
The true test of proper trace is whether the oils and lye solution remain permanently integrated, indicating that the chemical reaction necessary for soap formation is underway.
Molecular Bond Formation
Behind every successful batch of handmade soap lies a fascinating chemical dance occurring at the molecular level. When you achieve perfect trace, you're witnessing the initial stages of saponification where triglycerides from your oils react with sodium hydroxide to form stable bonds. This transformation marks the pivotal moment when your mixture becomes truly emulsified.
You'll recognize this chemical reaction through:
- A noticeable thickening as molecular bonds form between fatty acids and lye
- A cloudy appearance developing as soap molecules begin to take shape
- The ability of the mixture to hold a "trail" when drizzled across itself
For ideal molecular bond formation, maintain temperatures between 100-130°F. Lower temperatures might create false trace, where your ingredients appear mixed but haven't actually formed the chemical bonds necessary for true saponification.
Visual Indicators of Light, Medium, and Thick Trace

When making soap, you'll first notice light trace resembling thin cake batter without oil streaks—perfect for adding colorants before the mixture thickens.
As your soap progresses to medium trace, it'll develop a pudding-like consistency that leaves ribbons when drizzled, ideal for suspending additives like herbs.
Watch for thick trace's shape-holding properties that enable textured designs, but don't confuse it with false trace, which looks similar but lacks proper emulsification and can cause skin irritation.
Recognizing Light Trace
Identifying light trace correctly marks your first critical milestone in the soap-making process. At this stage, your soap mixture resembles thin cake batter—pourable yet slightly thickened.
You'll notice the emulsification process has begun when the mixture appears uniform in color with no oil streaks visible.
To confirm you've reached light trace:
- Drizzle some soap onto the surface with a spoon—it should leave a faint trail that quickly disappears
- Check the consistency—it should pour easily but with slightly more resistance than your initial oils
- Note the timing—typically 1-5 minutes of mixing, depending on your method and oil choices
This is the perfect moment to incorporate colorants and fragrances, as you'll have ample working time before the mixture thickens further.
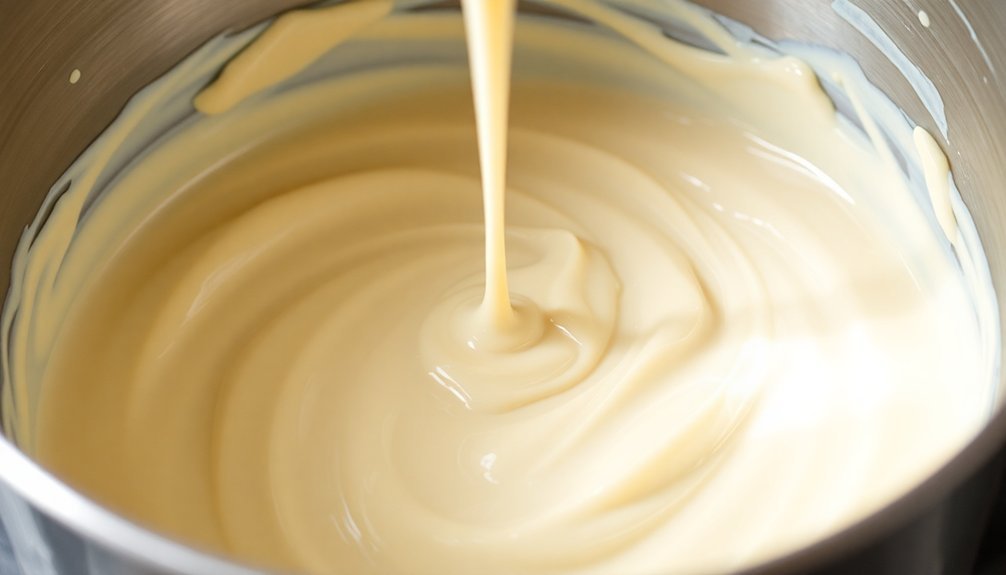
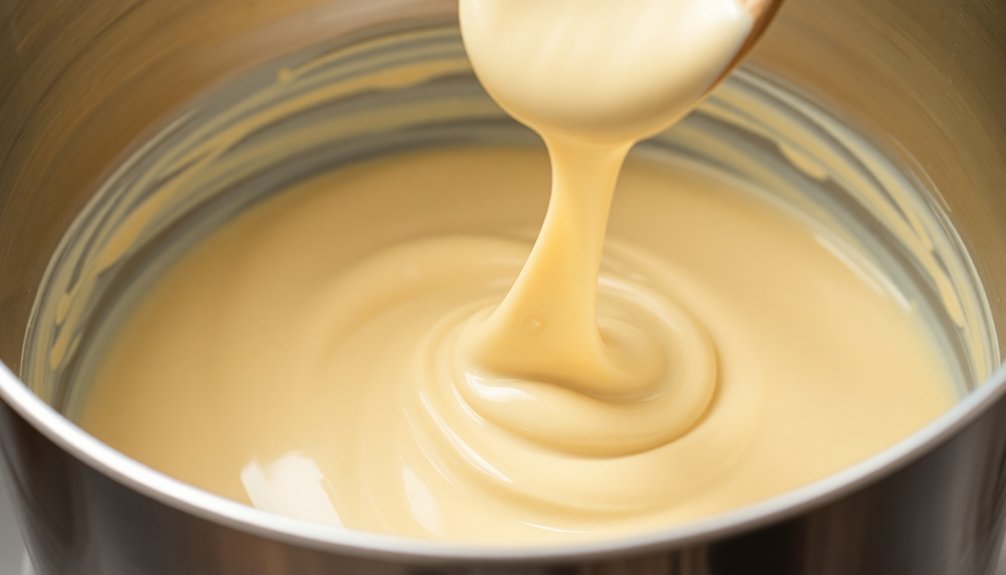
Medium Trace Characteristics
After achieving light trace, your soap batter will continue to thicken until it reaches medium trace—a vital stage that offers the perfect balance between workability and stability.
You'll recognize medium trace by its pudding consistency that's still fluid enough to pour easily into molds while leaving a visible trail when drizzled from a spoon.
This sweet spot typically develops after 3-5 minutes of mixing with your stick blender, depending on your recipe.
Maintaining oil and lye temperatures between 100-130°F is essential to prevent premature thickening.
When you've reached medium trace, your soap is perfectly emulsified and ready for heavier additives like herbs or colorants, which won't sink or blend too quickly.
This stage gives you enough time to work while ensuring your additives remain properly suspended.
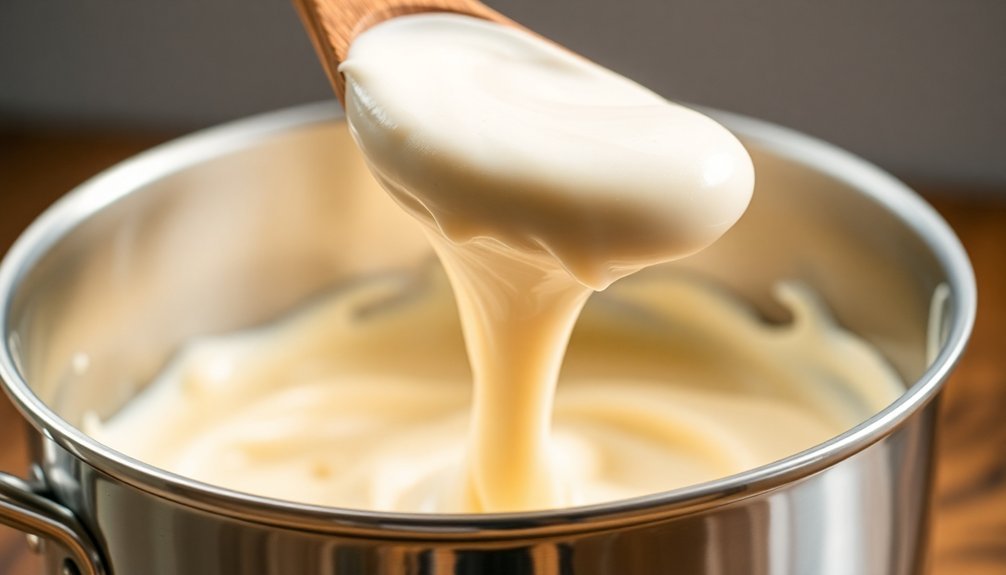
Thick Trace Signs
Recognition of soap trace stages forms the foundation of successful soapmaking. When your soap mixture reaches thick trace, you'll notice a dramatic change from its previous medium trace state. The consistency becomes remarkably pudding-like, holding its shape when drizzled onto itself.
Three key indicators of thick trace:
- The soap mixture maintains peaks and valleys when stirred, unlike light trace's cake batter consistency.
- When drizzled, it leaves a prominent visible trail that sits on the surface rather than disappearing.
- The saponification process is well underway, creating a workable medium that holds its form without flowing.
This thick trace stage is ideal for creating textured tops, implementing layering techniques, and developing intricate designs—but requires quick work before the mixture becomes too solid to manipulate.
Texture Analysis: How Perfect Trace Feels on Your Spoon
The spoon test reveals everything you need to know about perfect soap trace. When you lift your spoon, the soap batter should drizzle back into your mixture, creating a distinct pattern that holds its shape momentarily before gradually merging back. This pudding-like consistency indicates you've achieved the ideal emulsified state.
Pay attention to how the mixture feels against your utensil. Perfect trace has a creamy, substantial quality—neither too runny nor excessively thick. Your spoon should meet slight resistance, similar to medium-bodied frosting.
The soap should feel cohesive and smooth, with enough structure to support additional ingredients while remaining workable. Trust your tactile senses; when the batter feels like it's between a liquid and a solid, you're right where you need to be.
Common Mistakes in Identifying True Trace
While mastering the spoon test gives you confidence, many soapmakers still fall prey to deceptive appearances when identifying trace. The most common error is mistaking false trace for true trace—when your mixture appears thick but hasn't properly emulsified, often due to temperature issues or cooling solid oils.
For consistent success, avoid these essential mistakes:
- Relying solely on visual cues without confirming the mixture holds its shape and leaves a persistent trace line.
- Rushing the process when timing is vital—pouring at too light a trace prevents proper saponification.
- Ignoring consistency throughout the mixture—true trace should be uniform like pudding, not just thick in spots.
Temperature's Role in Achieving Ideal Trace Consistency
Finding your way to perfect trace depends greatly on temperature control throughout the soap-making process. The sweet spot for achieving ideal trace lies between 100-130°F, with warmer temperatures accelerating emulsification.
For intricate designs requiring detailed swirls, aim for the lower end (100-110°F) to extend your working time. Remember that recipes high in hard oils reach trace faster at elevated temperatures, while excessive cooling can cause false trace as oils begin solidifying.
Pay close attention to both your lye solution and oils before combining them. When both components are too cool, you'll struggle with slow trace development and potential separation.
Maintaining consistent temperature throughout your process is key—fluctuations can lead to uneven texture and poor emulsification. By mastering temperature control, you'll consistently achieve that perfect, predictable trace.
Equipment That Helps Recognize Perfect Trace
Experienced soapmakers rely on specific tools to identify that elusive perfect trace with confidence. A stick blender dramatically accelerates emulsification, revealing visual indicators of trace within minutes rather than hours of hand stirring.
Using a clear mixing bowl lets you observe how your soap batter thickens as it progresses through different trace stages.
For best results:
- Use a reliable thermometer to maintain temperatures between 100-130°F, as proper temperature greatly impacts how quickly you'll achieve trace.
- Keep a spatula handy to drizzle soap batter over itself, watching how long patterns remain visible on the surface.
- Consider pH testing strips to confirm proper saponification has occurred, ensuring no dangerous lye pockets remain.
These tools transform trace recognition from guesswork to precision, giving you consistent results every time.
Oils and Their Impact on Trace Development
Different oils contribute uniquely to your soap's trace development, creating a spectrum of setting speeds you'll need to understand for successful batches. Hard oils like coconut and palm, which contain high saturated fats, accelerate trace—often achieving thick consistency within minutes.
In contrast, liquid oils with unsaturated fats, such as olive or canola, produce a slower trace.
The temperature of your oils greatly affects emulsification; warmer oils (100-130°F) combine with lye more readily than cooler ones. Be vigilant about properly melting solid oils to avoid false trace, where incomplete emulsification occurs.
Remember that lower molecular weight oils like castor oil facilitate faster trace due to their superior emulsifying properties. By selecting and balancing your oils strategically, you'll gain better control over your soap's trace development.
Fragrance Acceleration: Managing Unexpected Trace Changes
While oils form the foundation of your soap's trace behavior, fragrance oils often throw an unexpected curveball into your carefully planned process. That beautiful swirl design you've envisioned can quickly become impossible when your soap batter accelerates from light trace to pudding consistency in minutes.
To maintain control over trace behavior when using fragrance oils:
- Add at strategic moments – Wait until you've reached light or medium trace before incorporating fragrance oils to maximize your working time.
- Pre-mix with base oils – Blend your fragrance with a small portion of your recipe oils first to minimize acceleration shock.
- Monitor temperature – Keep your soap batter cooler when adding accelerating fragrances to slow the reaction process.
Testing fragrances in small batches helps you predict their impact and achieve controlled trace consistently.
Troubleshooting False Trace vs. True Emulsification
You'll need to carefully observe your soap mixture's behavior to distinguish false trace from true emulsification.
If your soap batter suddenly thickens when temperatures drop too low, you're likely experiencing a temperature-related seizure rather than proper saponification.
Watch for oil separation occurring after what appeared to be trace—this key indicator reveals your soap only reached false trace and requires reheating to achieve true emulsification.
Subheading Discussion Points
How can soapmakers distinguish between a deceptive false trace and genuine emulsification?
When oils cool below their melting points during saponification, they can create a thickened consistency that mimics true trace without being properly emulsified. This false trace can lead to separation and unreacted lye in your final soap.
To identify true emulsification:
- Drizzle test – A properly emulsified mixture leaves a visible trail that sits momentarily on the surface before sinking back in.
- Temperature monitoring – Keep your oils and lye solution between 100-130°F to prevent false trace.
- Visual assessment – True trace appears smooth and homogenous throughout, while false trace may look grainy or separated.
Always verify all solid oils are completely melted before adding lye to achieve perfect emulsification.
Identifying Temperature-Related Seizures
Temperature fluctuations often trigger the most frustrating soap batches, causing either premature seizure or deceptive false trace that leads to separation later.
True emulsification happens when your soap mixture maintains thickness consistently, while false trace only mimics this texture without complete saponification.
You'll recognize false trace when your batter thickens prematurely as temperature drops below your solid oils' melting point.
Keep both oils and lye between 100-130°F to achieve proper emulsification. If your soap seizes unexpectedly, check if you're working at too high a temperature or if hard oils are accelerating saponification.
To prevent these issues, guarantee all solid oils remain fully melted before combining with lye solution, and maintain a consistent mixing temperature throughout your process.
This vigilance helps distinguish between authentic trace and temperature-related thickening.
Oil Separation Signs
Vigilant soapmakers can distinguish between false trace and true emulsification by watching for telltale oil separation signs.
When your soap batter doesn't properly emulsify, you'll notice oils pooling on the surface rather than incorporating into the mixture. This false trace can ruin your final product by preventing complete saponification.
To identify true trace versus problematic oil separation:
- Drizzle test – A properly emulsified mixture leaves visible trails when drizzled onto itself, while false trace doesn't hold patterns.
- Consistent texture – True trace maintains a uniform appearance without oil slicks or separation.
- Thickness development – Genuine emulsification gradually thickens as you work with your stick blender, while false trace appears thick but quickly thins out.
If you spot oil separation, adjust temperatures (aim for 100-130°F) and increase blending time.
Trace Techniques for Different Soap Designs
Mastering different trace techniques is crucial when creating various soap designs, as each style requires its own specific consistency to achieve the best results.
For intricate swirls, aim for a medium trace that's thick enough to support colors while remaining fluid enough for manipulation.
When crafting layered soaps, you'll want a thick trace that holds its shape and creates clean lines between colors.
Conversely, if you're working with embeds or heavy additives, a light trace provides the perfect consistency to suspend these elements without sinking or floating.
If you're using fragrances known to accelerate trace, add them after reaching a light to medium trace to extend your working time.
Always guarantee oils and butters are fully melted before mixing to prevent false trace that could compromise your soap designs.
Stick Blender Strategies for Controlling Trace Progression
Though seemingly simple to operate, your stick blender is the most powerful tool for controlling soap trace progression. What takes hours by hand stirring, your stick blender accomplishes in just 1-2 minutes.
To master emulsification timing and prevent soap from thickening too quickly:
- Alternate between stirring and short blender bursts to maintain precise control over consistency.
- Use lower speeds when you need more time to incorporate colorants before the mixture thickens.
- Check your batter frequently during blending to identify exactly when you've reached your desired trace level.
Always verify oils and butters are completely melted before beginning to avoid false trace, which happens when solid fats cool and prematurely thicken your mixture.
This careful approach gives you maximum control over your soap's development.
Additives That Affect Trace Behavior
While your soap recipe itself plays a notable role in trace development, various additives can dramatically alter how quickly your soap thickens.
Clay additives absorb moisture and accelerate trace, so pre-mix them with water before adding to your soap mixture for better control.
Fragrance oils are notorious trace accelerators—add them after colorants to maximize your working time.
High percentages of hard oils and butters in your recipe will speed up emulsification due to their solid nature at room temperature.
Be cautious when introducing cold additives late in the process; essential oils can unexpectedly accelerate your soap's consistency.
Similarly, implementing a water discount not only creates harder bars with shorter curing times but also considerably speeds up trace development.
Understanding these trace-affecting elements gives you greater control over your soap's working time and final texture.
Frequently Asked Questions
What Does Trace in Soap Making Look Like?
Trace in soap making looks like a thickened mixture. You'll notice it's reached trace when your mix leaves a visible trail on the surface. It evolves from light (thin batter) to thick (pudding-like) consistency.
How Long Does It Take to Bring Soap to Trace?
You'll reach trace in 1-2 minutes with a stick blender or up to 2 hours when hand stirring. Factors like oil types, temperature, and additives affect timing. Hard oils trace faster than liquid oils.
What Happens if Soap Doesn't Trace?
If your soap doesn't trace, you'll face separation issues and potential skin irritation from unreacted lye. You'll need to apply heat or use a stick blender to encourage emulsification and complete the saponification process.
What Causes False Traces in Soap Making?
False trace occurs when your oils cool too quickly and solidify before proper saponification. You'll see a thick, creamy mixture that's actually just cooled fats, not true soap. Maintain temperatures between 100-130°F to prevent this.
In Summary
You'll know you've achieved perfect trace when your soap batter leaves a visible trail that holds briefly on the surface. Don't rush this critical phase—it's your foundation for successful soapmaking. Trust both your eyes and the resistance against your spoon. With practice, you'll recognize the exact moment when light trace provides workability while ensuring proper emulsification. Remember, different recipes trace differently, so adjust your technique accordingly.


Leave a Reply